Questions You Might Have:
- How do I create and validate a web form using Node.js?
- What happens after I submit the form?
- How do I handle form errors in a Node.js environment?
Quick Steps:
Step-by-Step Guide to Web Form Processing with Node.js
1. Setup Your Node.js Environment
First, please ensure you have Node.js installed on your computer. Node.js is essential for running JavaScript on the server.
To check if Node.js is installed, open your terminal and run:
node -v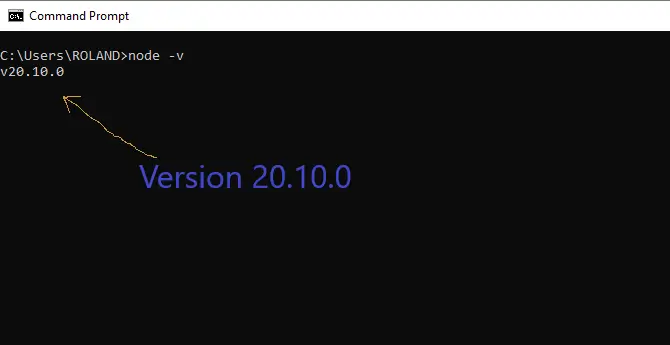
Version 20.10.0 👍
📝 Note: You might have a different version installed. No need for alarms; you’re still good to go.
If Node.js is not installed, follow this guide for a step-by-step installation process on various platforms.
2. Setup Project Folder
Creating a project folder and setting it up in Visual Studio Code allows you to start working on your project immediately.
Follow these steps:
👉 Create a Project Folder:
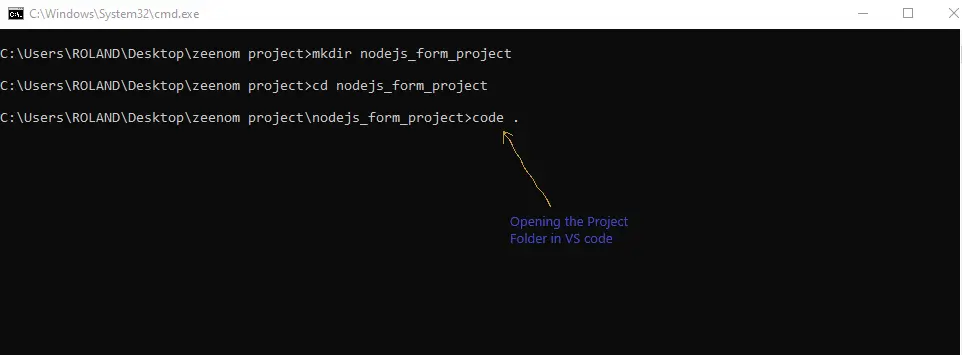
Open your terminal and run the following commands to create and navigate into your project folder:
mkdir nodejs_form_project
cd nodejs_form_project- “mkdir nodejs_form_project”: Creates the project folder.
- “cd nodejs_form_project”: Navigates into the project folder.
Note: The folder name “nodejs_form_project” is just a suggestion. Feel free to choose any name you like.
👉 Open the Project in Visual Studio Code:
After navigating to the project folder, open it in Visual Studio Code using the following command:
code .This command will launch Visual Studio Code with the current directory opened, allowing you to start working on your project right away.
3. Initialize a New Node.js Project:
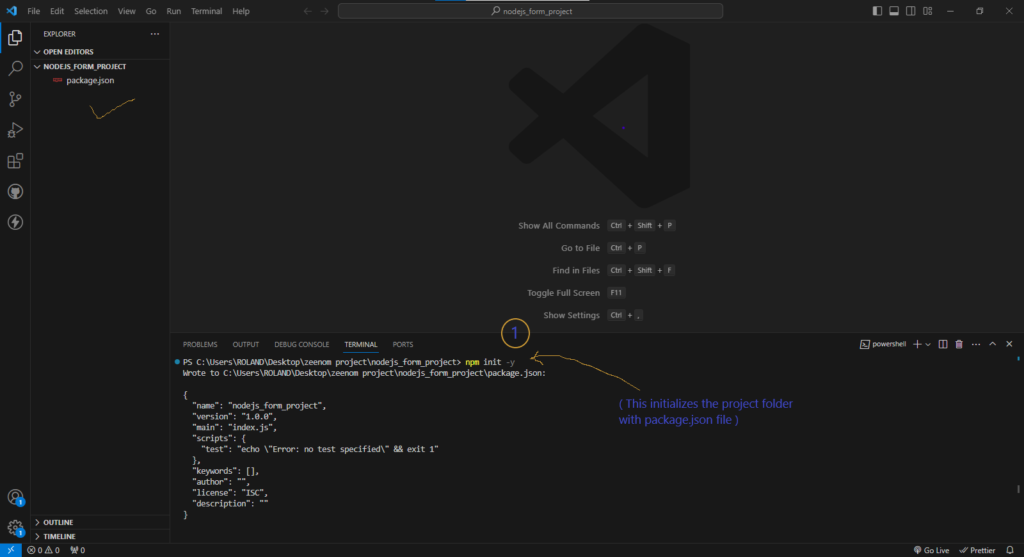
In your terminal within Visual Studio Code, initialize a new Node.js project:
npm init -yThis command will create a “package.json” file with default settings, which you can customize later as needed.
4. Install Necessary Packages
Next, install the required packages for your project:
- Express: A web application framework for Node.js, it simplifies the server creation process.
- body-parser: A middleware to parse incoming request bodies, making it easier to handle form data.
- EJS (Embedded JavaScript templates): A simple templating language that lets you generate HTML markup with plain JavaScript. It’s useful for rendering dynamic content in your web applications.
- express-validator: A set of express.js middleware for validating and sanitizing input strings. It helps in ensuring the data received from the user is clean and meets your application’s requirements.
Install these packages by running on your terminal:
npm install express body-parser ejs express-validator📝 Note: Set “type: module” in your “package.json” file to use the ES6 format.
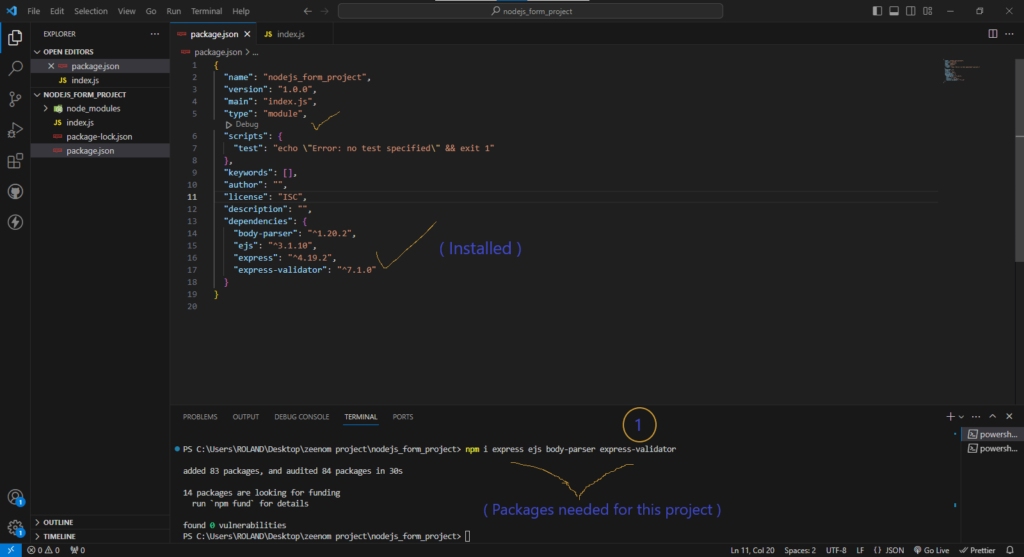
By following these steps, you’ll have your project folder set up and ready to go in.
5. Setup a Basic Nodejs Server:
Set up an Express server to handle GET and POST requests and render views using EJS. Follow the standard MVC pattern by creating route, view, and controller folders.
📝 Note: This organization makes your project scalable and easier to maintain.
Directory Structure:
project-folder/
│
├── controllers/
│   └── formController.js
├── routes/
│   └── formRoutes.js
├── views/
│   └── form.ejs
│   └── success.ejs
├── index.js
├── package.json
👉 Create a Basic Server and Set View to EJS
index.js
import express from "express";
import bodyParser from "body-parser";

import formRoute from "./routes/formRoute.js"

const app = express()

app.set("view engine", "ejs")
app.use(bodyParser.urlencoded({extended: true}))

app.use("/", formRoute)

app.listen(8080, () => {
    console.log("Server started on port 8080");
})- “index.js” – This is the entry point of your web app.
- First, import the required packages using ES6’s import statement.
- Then, bring in your route handler, which directs your requests to the appropriate method.
- Set the view engine to EJS to generate HTML templates, and use body-parser to parse request body values from the form.
- Your web app will listen on port 8080 and log a message saying “Server started on port 8080.”
- Finally, to start your server, run “node index.js” on your terminal.
- Voila! Your server is up and running.
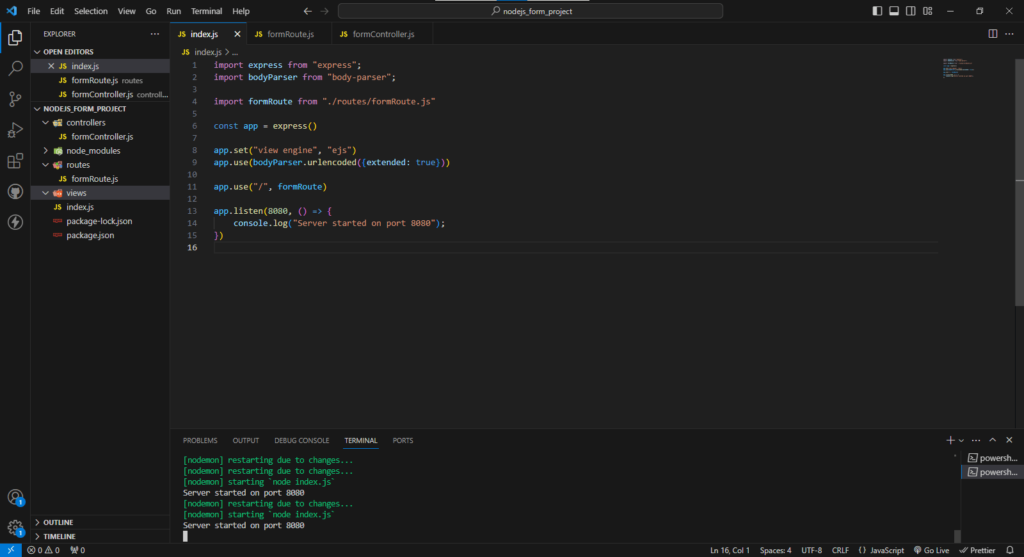
📝 Note: You can choose any port that suits your needs. Common choices are 3000, 8080, or 5000. If you’re not sure, 8080 is a solid default.
When you access your web app at “localhost:8080”, the request is handled by the route specified in app.use(“/”, formRoute). This directs the request to formRoute, which we need to create to manage different methods.
👉 Understanding the Route and Controller Concept
- Route: A route defines a path in your web app and specifies what to do when that path is accessed.
- Controller: A controller contains functions that handle the logic for different routes. It separates the business logic from the route definitions, making the code more organized and maintainable.
Creating formRoute
routes/formRoute.js
import express from "express";
import { getForm, getSuccess, postForm } from "../controllers/formController.js";

const router = express.Router()

router.get("/form", getForm)
router.post("/form", postForm)
router.get("/success", getSuccess)

export default router
Explanation
- Import Express and Controller Functions: This imports the necessary modules and functions. “express” is used to create the router, and getForm, postForm, and getSuccess are functions in the controller that handles the logic for different routes. They are defined in the formController.js file.
- express.Router(): This initializes a new router instance, which helps in organizing your routes.
- GET /form: When a user navigates to “localhost:8080/form“, the getForm function displays the form.
- POST /form: When a user submits the form, the postForm function processes the form data.
- GET /success: When the form submission is successful, the getSuccess function displays a success message.
- Then you export the router so it can be used in “index.js” like you saw in the first file where you imported the formRoute.
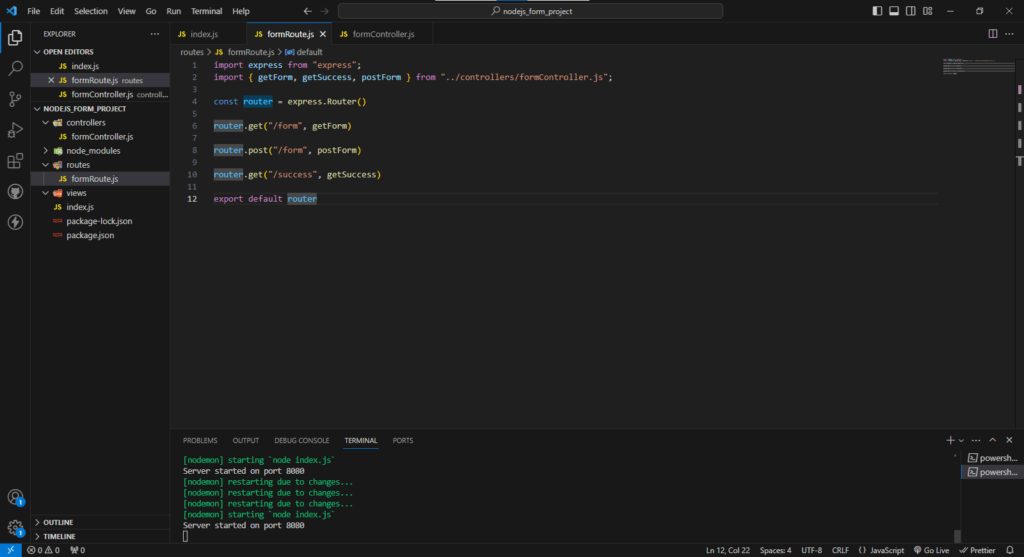
👉 Creating formController
Controllers, as we mentioned above, are functions that get executed based on the route assigned to them. They handle the logic for the routes specified.
For now, we have empty controllers, which we will start working on once we have our form views set for processing and displaying the various pages.
controllers/formController.js
// This is where you process your form inputs
export const getForm = (req, res, next) => {
    // Logic for displaying the form goes here
};

export const postForm = (req, res, next) => {
    // Logic for processing form submission goes here
};

export const getSuccess = (req, res, next) => {
    // Logic for displaying the success page goes here
};
Explanation
- Define the Controller Functions:
- getForm: This function will handle displaying the form when the user accesses the /form route. For now, it’s empty, but we’ll add the logic to render the form view later.
- postForm: This function will handle processing the form submission when the user submits the form. It’s currently empty, but we’ll add the logic to handle form data and validation later.
- getSuccess: This function will handle displaying the success message when the user successfully submits the form. It’s empty for now, but we’ll add the logic to render the success view later.
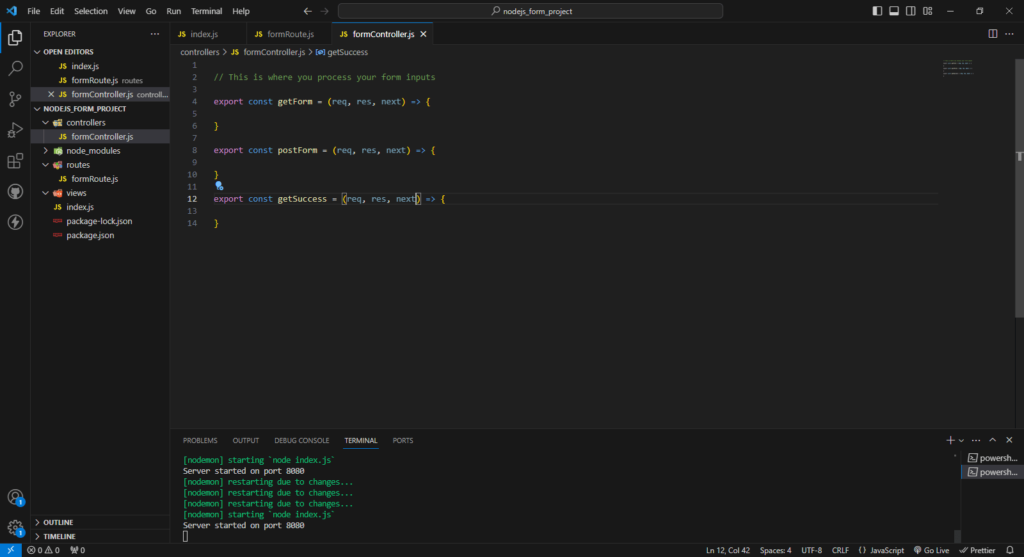
What’s Next?
Now that we have our controllers set up, we will focus on creating the views for the form and success pages.
Once the views are in place, we’ll add the necessary logic to our controller functions to handle displaying the form, processing the form submission, and showing the success message.
This separation of concerns, where the routes are defined in one file and the logic is handled in another, makes your code more modular and easier to maintain.
As a result, your web app becomes more scalable and manageable.
6. Setup a Form in Your Application
How do you get the user’s input in your application?
Do you know?
Well, it’s simply through a form.
You need to set up a form in your views folder to accept user input, then sanitize and process the inputs in your “formController.js” that we already set up.
For this, EJS (Embedded JavaScript templates), which we installed at the beginning of this project, becomes handy.
Let’s get started.
👉 Create the Form View
In your views folder, create a file named “form.ejs” to display the user form. You can name your file anything you like, but for consistency, we’ll use form.ejs.
views/form.ejs
<!DOCTYPE html>
<html lang="en">
<head>
    <meta charset="utf-8" />
    <meta name="viewport" content="width=device-width, initial-scale=1" />
    <title>NodeJs Form Project</title>
    <link href="https://cdn.jsdelivr.net/npm/bootstrap@5.3.3/dist/css/bootstrap.min.css" rel="stylesheet" integrity="sha384-QWTKZyjpPEjISv5WaRU9OFeRpok6YctnYmDr5pNlyT2bRjXh0JMhjY6hW+ALEwIH" crossorigin="anonymous" />
</head>
<body>
    <div class="container col-xl-10 col-xxl-8 px-4 py-5">
        <div class="row align-items-center g-lg-5 py-5">
            <div class="col-lg-7 text-center text-lg-start">
                <h1 class="display-4 fw-bold lh-1 text-body-emphasis mb-3">Building Powerful Web Forms with Node.js</h1>
                <p class="col-lg-10 fs-4">An HTML form is used to collect user input. The user input is most often sent to a server for processing. <br> <a href="#">Click me NOW! to view a tutorial on that.</a></p>
            </div>
            <div class="col-md-10 mx-auto col-lg-5">
                <form method="POST" class="p-4 p-md-5 border rounded-3 bg-body-tertiary">
                    <div class="form-floating mb-3">
                        <input type="text" class="form-control" id="floatingFirstName" placeholder="First Name" name="first_name" />
                        <label for="floatingFirstName">First Name</label>
                    </div>
                    <div class="form-floating mb-3">
                        <input type="text" class="form-control" id="floatingLastName" placeholder="Last Name" name="last_name" />
                        <label for="floatingLastName">Last Name</label>
                    </div>
                    <div class="form-floating mb-3">
                        <input type="email" class="form-control" id="floatingInput" placeholder="name@example.com" name="email" />
                        <label for="floatingInput">Email address</label>
                    </div>
                    <div class="form-floating mb-3">
                        <input type="password" class="form-control" id="floatingPassword" placeholder="Password" name="password" />
                        <label for="floatingPassword">Password</label>
                    </div>
                    <button class="w-100 btn btn-lg btn-primary" type="submit">Sign up</button>
                    <hr class="my-4" />
                    <small class="text-body-secondary">By clicking Sign up, you agree to the terms of use.</small>
                </form>
            </div>
        </div>
    </div>
    <script src="https://cdn.jsdelivr.net/npm/bootstrap@5.3.3/dist/js/bootstrap.min.js" integrity="sha384-0pUGZvbkm6XF6gxjEnlmuGrJXVbNuzT9qBBavbLwCsOGabYfZo0T0to5eqruptLy" crossorigin="anonymous"></script>
</body>
</html>
👉 Rendering the Form in Your Controller
To display the above form in your web app, you need to render the form in the getForm controller in your formController.js.
controllers/formController.js
// This is where you process your form inputs
export const getForm = (req, res, next) => {
    res.render("form"); // Renders the form.ejs view
};

export const postForm = (req, res, next) => {
    // Logic for processing form submission goes here
};

export const getSuccess = (req, res, next) => {
    // Logic for displaying the success page goes here
};
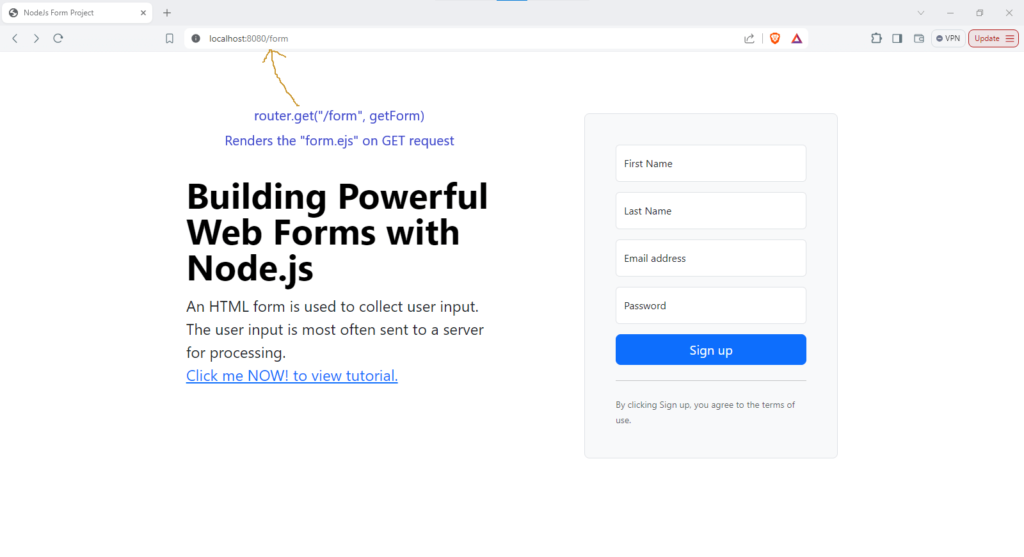
👉 How It Works
When you click the “Sign up” button on the form, the form values are sent to the route router.post(“/form”, postForm) for processing. The “postForm controller” will then handle the form input.
Notice the name attribute added to the input fields in the form.
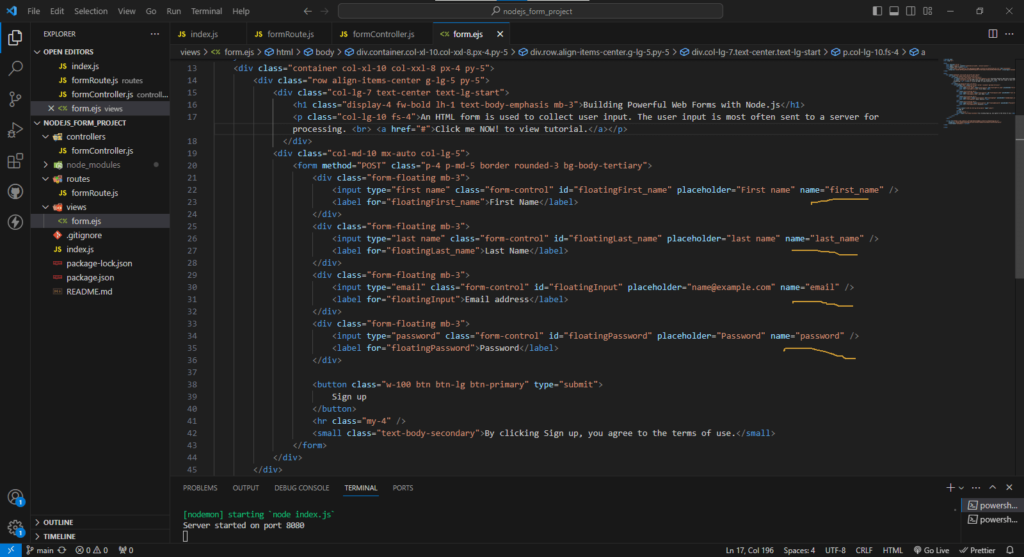
This is used to reference each input and manipulate it as needed.
We use the POST method for the form to ensure sensitive information is not displayed in the URL.
By following these steps, you set up a functional form in your application that collects user input and processes it securely.
7. Validate User Input
Great job reaching this far!
After clicking the “Sign up” button, the form values are sent to router.post(“/form”, postForm). Here, you sanitize and process the values in the “postForm” controller you created earlier.
To sanitize the user input, use the “express-validator” we installed at the beginning.
Importing Validators
First, import body and validationResult from express-validator.
import { body, validationResult } from "express-validator";👉 Setting Up Your Controllers
Let’s update your “formController.js” to include validation.
To seamlessly pass user details to the success page after validating and sanitizing inputs, follow these steps in your “postForm controller“:
- Validate and Sanitize Inputs: Ensure that all form fields (first name, last name, email, password) are checked for correctness and cleaned of any harmful input.
- Handle Validation Results: After validation, check if there are any errors. If errors exist, promptly display them back on the form page for correction.
- Prepare User Object: If validation passes, extract sanitized values (first name, last name, email, password) from the request body.
- Store User Data in Session: Save the sanitized user data into the session to persist it across requests securely.
- Redirect to Success Page: Once the user data is securely stored, redirect to the success page where you’ll display a confirmation message or further details.
Here’s how you can implement this in your postForm controller using active voice and concise explanations:
controllers/formController.js
import { body, validationResult } from "express-validator";
import session from "express-session";

// Render the form
export const getForm = (req, res, next) => {
    res.render("form");
};

// Handle form submission with validation
export const postForm = [
    // Validate and sanitize fields
    body("first_name")
        .notEmpty().withMessage("First name is required!")
        .trim().isLength({ min: 1 }).escape(),
    body("last_name")
        .notEmpty().withMessage("Last name is required!")
        .trim().isLength({ min: 1 }).escape(),
    body("email")
        .notEmpty().withMessage("Email is required!")
        .trim().isEmail().withMessage("Not a valid email address!").escape(),
    body("password")
        .notEmpty().withMessage("Password is required!")
        .trim().isLength({ min: 4 }).withMessage("Password must be at least 4 characters long!").escape(),

    // Process the form submission
    (req, res, next) => {
        const errors = validationResult(req);

        // If there are validation errors, re-render the form with errors
        if (!errors.isEmpty()) {
            return res.render("form", { errors: errors.array() });
        }

        // Extract sanitized values
        const { first_name, last_name, email, password } = req.body;

        // Create a user object
        const user = {
            firstName: first_name,
            lastName: last_name,
            email: email,
            password: password
        };

        // Store user data in session
        req.session.user = user;

        // Redirect to the success page
        res.redirect("/success");
    }
];

// Render the success page
export const getSuccess = (req, res, next) => {
    res.render("success");
};
- The postForm array first validates and sanitizes the form inputs.
- If there are validation errors, it re-renders the form with the error messages.
- If the inputs are valid, it extracts the sanitized values and creates a user object.
- Finally, it redirects to the success page after setting the session.
By structuring your postForm controller in this manner, you ensure that user inputs are rigorously checked, sanitized for security, and then safely stored in session for future use.
This approach not only enhances security by preventing malicious inputs but also provides a clear pathway for handling successful form submissions and subsequent page navigation
📝 Note: Remember to install express-session package for handling the user session data across multiple requests.
Use the command below to install express-session:
npm install express-sessionImport in your formController.js as we did above. With that, you are good to go.
8. Displaying Error Message
Great job reaching this point!
We’ve defined the error messages in your postForm controller.
Now, let’s display these messages to the user.
This way, users receive feedback on whether the form submission succeeded or failed.
Below is how you can render the error messages in your form view:
views/form.ejs
<!DOCTYPE html>
<html lang="en">
<head>
    <meta charset="utf-8" />
    <meta name="viewport" content="width=device-width, initial-scale=1" />
    <title>NodeJs Form Project</title>
    <link href="https://cdn.jsdelivr.net/npm/bootstrap@5.3.3/dist/css/bootstrap.min.css" rel="stylesheet"
          integrity="sha384-QWTKZyjpPEjISv5WaRU9OFeRpok6YctnYmDr5pNlyT2bRjXh0JMhjY6hW+ALEwIH" crossorigin="anonymous" />
</head>
<body>
    <div class="container col-xl-10 col-xxl-8 px-4 py-5">
        <div class="row align-items-center g-lg-5 py-5">
            <div class="col-lg-7 text-center text-lg-start">
                <h1 class="display-4 fw-bold lh-1 text-body-emphasis mb-3">Building Powerful Web Forms with Node.js</h1>
                <p class="col-lg-10 fs-4">
                    An HTML form is used to collect user input. The user input is most often sent to a server for processing.
                    <br>
                    <a href="#">Click me NOW! to view tutorial.</a>
                </p>
            </div>
            <div class="col-md-10 mx-auto col-lg-5">
                <form method="POST" class="p-4 p-md-5 border rounded-3 bg-body-tertiary">
                    <!-- Error Messages -->
                    <% if (typeof errors !== 'undefined' && errors.length) { %>
                        <% errors.forEach((error) => { %>
                            <div class="alert alert-danger" role="alert">
                                <%= error.msg %>
                            </div>
                        <% }) %>
                    <% } %>

                    <div class="form-floating mb-3">
                        <input type="text" class="form-control" id="floatingFirst_name" placeholder="First name" name="first_name" />
                        <label for="floatingFirst_name">First Name</label>
                    </div>
                    <div class="form-floating mb-3">
                        <input type="text" class="form-control" id="floatingLast_name" placeholder="Last name" name="last_name" />
                        <label for="floatingLast_name">Last Name</label>
                    </div>
                    <div class="form-floating mb-3">
                        <input type="email" class="form-control" id="floatingInput" placeholder="name@example.com" name="email" />
                        <label for="floatingInput">Email address</label>
                    </div>
                    <div class="form-floating mb-3">
                        <input type="password" class="form-control" id="floatingPassword" placeholder="Password" name="password" />
                        <label for="floatingPassword">Password</label>
                    </div>

                    <button class="w-100 btn btn-lg btn-primary" type="submit">Sign up</button>
                    <hr class="my-4" />
                    <small class="text-body-secondary">By clicking Sign up, you agree to the terms of use.</small>
                </form>
            </div>
        </div>
    </div>

    <script src="https://cdn.jsdelivr.net/npm/bootstrap@5.3.3/dist/js/bootstrap.min.js"
            integrity="sha384-0pUGZvbkm6XF6gxjEnlmuGrJXVbNuzT9qBBavbLwCsOGabYfZo0T0to5eqruptLy"
            crossorigin="anonymous"></script>
</body>
</html>
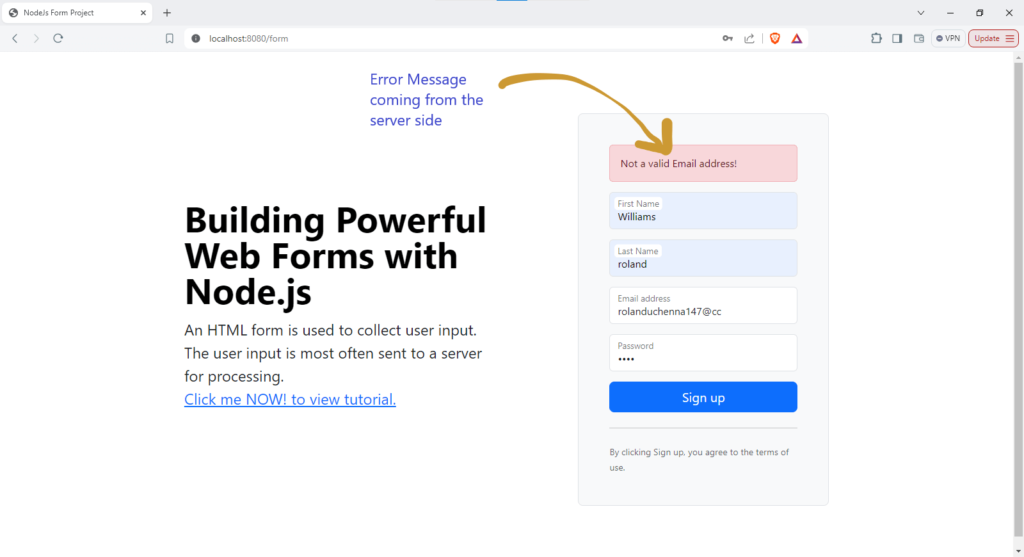
👉 Explanation
Error Messages:
<% if (typeof errors !== 'undefined' && errors.length) { %>
    <% errors.forEach((error) => { %>
        <div class="alert alert-danger" role="alert">
            <%= error.msg %>
        </div>
    <% }) %>
<% } %>
This block checks if there are any errors. If errors exist, it loops through the array of errors and displays each error message within an alert box.
If you’re curious about the various looping methods in JavaScript, here’s a quick overview
By implementing the above code, you ensure that users receive immediate feedback on their input, whether it’s a success or if there are errors to address.
This improves the user experience by keeping them informed about the state of their form submission.
10. Redirect to a Success Page
Bravo! You’re almost there 👏
You’re more than a conqueror!
👉 Configuring express-session
To fully set up the session, open your index.js file and configure express-session as follows:
import express from "express";
import bodyParser from "body-parser";

import formRoute from "./routes/formRoute.js"
import session from "express-session";

const app = express()

// Configure the session middleware
const sessionMiddleware = session({
    secret: 'your_secret_key', // Replace with any strong secret key of your choice
    resave: false,
    saveUninitialized: true,
    cookie: { secure: false }
})

app.use(sessionMiddleware)

app.set("view engine", "ejs")
app.use(bodyParser.urlencoded({extended: true}))

app.use("/", formRoute)

app.listen(8080, () => {
    console.log("Server started on port 8080");
})
Explanation
- Installing express-session: To manage user sessions, we need to install the “express-session” package. This package helps store data like error messages and user information across different requests.
- Configuring the Session Middleware: We configure “express-session” with a secret key, and set options like resave, saveUninitialized, and cookie properties. The secure option for cookies should be set to “true” when using HTTPS.
👉 Creating the Success Page
Next, create a success page file in your views folder. This is where you will be redirected on successful form submission. It will display the user details that were passed through the session.
views/success.ejs
<!DOCTYPE html>
<html lang="en">

<head>
    <meta charset="utf-8" />
    <meta name="viewport" content="width=device-width, initial-scale=1" />
    <title>NodeJs Form Project</title>
    <link href="https://cdn.jsdelivr.net/npm/bootstrap@5.3.3/dist/css/bootstrap.min.css" rel="stylesheet"
        integrity="sha384-QWTKZyjpPEjISv5WaRU9OFeRpok6YctnYmDr5pNlyT2bRjXh0JMhjY6hW+ALEwIH" crossorigin="anonymous" />
</head>

<body>
    <main class="container mt-4">
        <div class="bg-body-tertiary p-5 rounded">
            <h1 class="text-success">Registration Successful!</h1>
                <p><b>First Name:</b> <%= user.firstName %></p>
                <p><b>Last Name:</b> <%= user.lastName %></p>
                <p><b>Email:</b> <%= user.email %></p>
        </div>
    </main>

    <script src="https://cdn.jsdelivr.net/npm/bootstrap@5.3.3/dist/js/bootstrap.min.js"
        integrity="sha384-0pUGZvbkm6XF6gxjEnlmuGrJXVbNuzT9qBBavbLwCsOGabYfZo0T0to5eqruptLy"
        crossorigin="anonymous"></script>
</body>

</html>
Output:
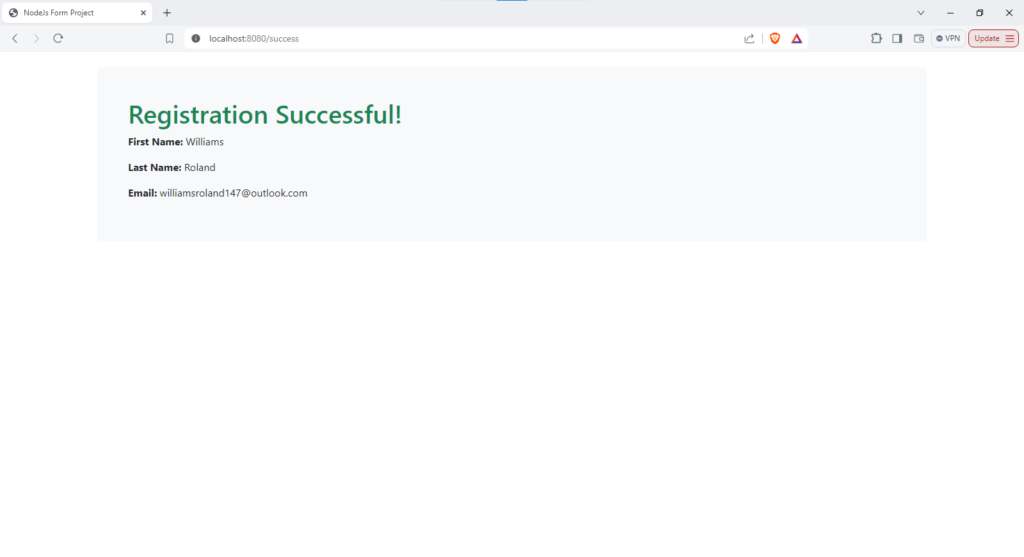
Congratulations on reaching this far.
You’ve done a great job!
Go buy yourself a chilled drink of your choice for achieving this milestone.
I’m really happy for you.
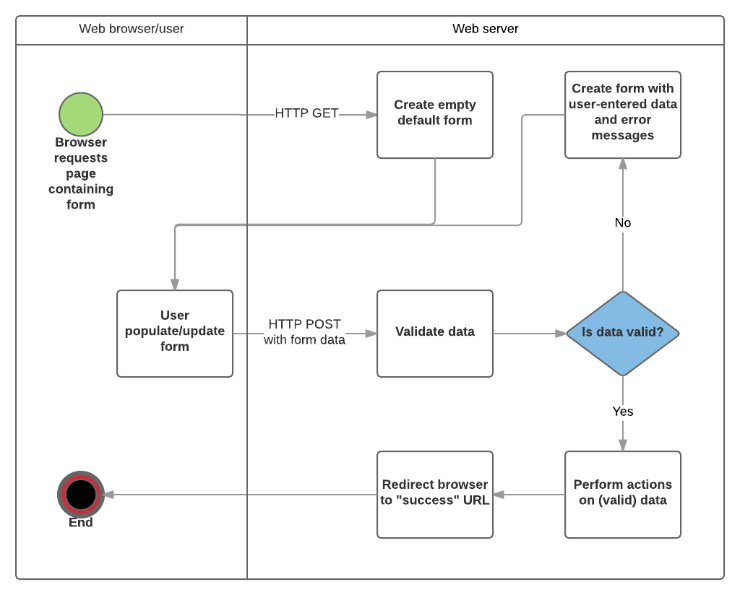
👉 Flowchart Summary
| Step | Action | Code Example |
|---|---|---|
| 1 | Create empty form | <form method=”post”>… |
| 2 | User fills form | <input type=”text” name=”first_name” value=”…”> |
| 3 | Validate data | app.post(‘/form’, body(‘first_name’).notEmpty(), … |
| 4 | Handle errors | <% errors.forEach(error => { … }) %> |
| 5 | Process valid data | res.redirect(‘/success’); |
Pro Tips
- Keep Forms Simple: Avoid overwhelming users with too many fields.
- Provide Clear Feedback: Use error messages to guide users in correcting mistakes.
- Secure Your Forms: Validate data on the server to prevent security issues.
Conclusion
Processing web forms with Node.js, Express Validator, express-session and EJS involves setting up a server, handling user input, validating data, and responding appropriately.
By following these steps, you can ensure a smooth user experience and robust form handling on your website.
👉 For a complete code of the whole process, check out on GitHub
You Might Also Like:
- Node.js Image Upload and Storage Simplified with Cloudinary
- Build Powerful Web Form with Node.js (Step-by-Step Guide)
- The CRUD Trap: Why Most Web Apps Fail Before They Even Start (And How to Avoid It)
- Confused About JavaScript Loops? We Can Help!
Share Your Thoughts
I’d love to hear how this guide helped you. Share your experience, ask questions, or give feedback in the comments below. Happy coding!